Friday, October 2, 2015

Welcoming the new arrival in the family

Hello friends -  I am back but with a different topic. Its five months since my blog was in cold storage. No, I am not hibernating!  In fact I have never been so busy in my life. My cooking has taken a back seat for the moment and all my other interests like sewing, knitting, quilting which were lying dormant for several years are now taking centre stage and all this is because we have now become grandparents to a cute little princess. Now everything centres around the little one. She keeps us all on our toes the whole day and night long but her one little smile is all that is needed for our tiredness to vanish. All said and done, I am not complaining. I am just loving it!

Whenever time permitted, I managed to do some small baby quilts, a quilt cover, a comforter and also knitted some sweaters and booties and bonnets etc..

A few of them which I am displaying here :


Sweaters, bonnets and booties
Cap and shoes
The patchwork quilt with satin base
This quilt and the one above were made from the leftover wool
Small quilts made from left over cotton cloth


A tiny set of bedsheet with pillow cover 
Another set of bedsheet and a matching pillow cover
  This Bedsheet (normal single bed adult size) with motifs was made
 by my late mother
Cotton comforter
Comforter made with batting inside
A blanket cover
Blanket cover - one side printed cotton cloth and the other side I
attached a motif (made by my late mother) on a plain cotton cloth
with an opening on one side.

My joy knew no bounds when I was told by my daughter that my grand daughter slept for 7 hours without waking up at night ( she would wake up almost every hour otherwise) when she used the comforter ( the blue one I made above) for the first time.

I am experiencing the  joys of being a grandma. Currently I am making some bibs - small drool bibs as well some large ones (apron bibs).


Saturday, April 18, 2015

Mango Rice


It's the mango season! And I got two home-grown raw mangoes from my friend's backyard (no, I did not steal them !). She distributed it to all her friends as they were in abundance. I made Aam Panna of the large one and decided to make mango rice of the other one. I had never tired it before but I was told that the method of preparation is the same as that of lemon rice. So without much ado, I embarked on this new dish. I cooked rice well in advance and since I also had a stock of roasted peanuts, it halved the cooking time. It tasted good but a bit tangy. You can adjust the quantity of the raw mango as per your taste.


Mango Rice


Ingredients:

Cooked Rice 2 cups
Raw mango (grated) 3/4th cup
Oil 2 tbsp
Mustard seeds 1 tsp
Curry leaves 1 sprig
Udad (split black gram) dal 1 tsp
Roasted Peanuts 1 tbsp
Turmeric powder 1/4th tsp
Green Chilies (chopped) 1 or 2
Ginger (finely chopped) 1 inch piece
Freshly grated coconut 2 tbsps
Freshly chopped coriander leaves For garnish
Salt As per taste


Method:

  1. Wash, peel and grate the raw mango. Measure 3/4th cup and set aside.
  2. Heat oil in a pan and add the mustard seeds and udad dal.
  3. When the mustard seeds starts spluttering, lower the heat and add the curry leaves and the roasted peanuts.
  4. Next add turmeric powder, chopped green chilies and chopped ginger. Saute it for a while.
  5. Then add grated raw mango. Give it a stir and let it cook for a few minutes.
  6. Now add grated coconut. Mix well.
  7. Finally add the cooked rice and salt. Mix well and garnish with freshly chopped coriander leaves.
  8. Serve hot with fried papads.

Main ingredients

Mustard and Udad dal in a pan of hot oil
Peanuts and curry leaves added to the tempering

Turmeric, chilies and ginger added
Addition of grated raw mango


Freshly grated coconut also added
Finally cooked rice added
Mango rice ready to be served
Mango Rice served with fried Pappads

Preparation time: 15 mins
Cooking time : 10 mins
Serves : 2


Note:
  • Rice should be prepared well in advance and cooled thoroughly before preparing this dish to get the best result. Alternatively, you can also use leftover rice.
  • You can substitute, cashew-nuts for peanuts.


Tuesday, March 31, 2015

Amaryllis

Last month when we returned home from our exceptionally long vacation, I was slightly upset on seeing the plight of my plants. This time especially, it was so bad, that I lost three plants.

This particular plant Amaryllis, (a type of lily) had all its leaves turned yellow. I didn't know whether it would survive. I was at my wits end. I trimmed all the yellow leaves, put some fresh soil and lightly watered it and after 15-20 days, lo behold! fresh green leaves started appearing and one fine day (after a month to be precise), I was quite excited to see a 
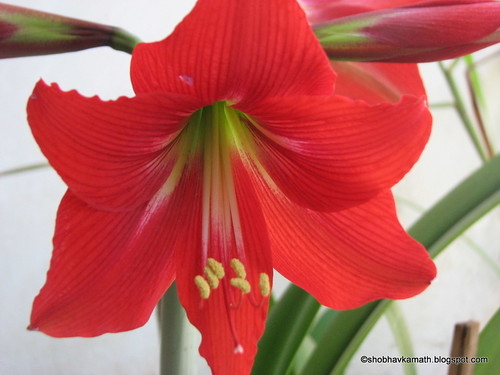
flower stalk coming out of the soil. From this single flower stalk, four buds will emerge and two of them will flower simultaneously followed by the other two in a matter of few days. This spectacular floral display is worth waiting for and a sight for sore eyes ! I was so relieved on seeing it come back to life that I decided to write about it and post those lovely display of floral colours before they disappear from my balcony.


IMG_2732


To be frank, this plant is quite hardy, hence it has survived so many years in my balcony. It doesn't require much care but it does need sunlight (not direct) and regular watering, well-drained soil and once a month I add some bio-compost which I get from the nearby nursery. Ofcourse, regular pruning will greatly help in keeping the plant healthy. I grew this from a bulb which my spouse got from his factory some years back.

A single flower stalk 

This flower stalk on opening will reveal four flower buds

As you can see, two of the buds have bloomed and  displayed their spectacular beauty 

Aren't they gorgeous ?

All the four buds have bloomed - a spectacular display of vibrant colour and floral beauty

This picture was from my previous collection wherein two flower stalks of buds had sprung up.

From my earlier collection
This  too is from my earlier collection


Friday, March 20, 2015

Coconut-Milk Cookies

At the onset, let me wish you all a Happy Ugadi / Gudi Padva

I am pleased to inform you all that recently I attended yet another cookery demonstration conducted by Nestle promoting their “Maggie” products. In all, four different items were prepared namely : Oats noodles, noodle cutlets, cookies, and noodle bhel-puri. All the items that were made were delicious and lip-smacking. We all were given to taste a small portion of each of the dishes that were prepared. With Ugadi round the corner, I thought it would be a good idea to prepare these delicious cookies and share this easy recipe with you all. It requires no eggs, no raising agent, no milk, no vanilla essence and no cardamom powder and yet tastes wonderful ! Sounds incredible ? Try it and see it for yourself.

I must admit here that I used the electric beater to beat the butter and sugar (it appears the excess beating was unnecessary ) with the result the cookies spread out a little horizontally which should not have happened. In any case the texture and the taste has not altered. It turned out nice and crispy. I intend to try this out again by rectifying this mistake and also by incorporating ragi flour and some dry fruits to make it more nutritious.

IMG_2761

Ingredients:

Maida (refined flour) 150 gms
Powdered Sugar 100 gms
Butter (salted) 150 gms
Coconut-Milk powder 100 gms


Method :

  1. Grease a baking tray and keep aside. Pre-heat the oven at 180° C.
  2. Beat lightly butter and sugar so that no lumps are formed.
  3. In the same bowl, add coconut-milk powder and maida and mix well to form a soft dough.
  4. Form small balls from this dough and lightly press on the top with a fork and place them on the greased baking tray.
  5. Place the baking tray in the pre-heated oven for 20 minutes or till done.
  6. Allow it to cool and store them in an air-tight container.


Ingredients
Butter and sugar beaten lightly 
Dough ready
All set to bake
Baking under process
Just out of the oven
Coconut milk cookies ready to be devoured
                           
Preparation time : 10 mins
Baking time : 20 mins
Makes : approx 20 cookies (depending upon the size)

Note:
  • Since, I used unsalted butter, I added a pinch of salt to it.
  • Beat butter and sugar lightly so that they are mixed well without any lumps.

Friday, February 27, 2015

Palak Raita


Most of us Indians are familiar with the word “raita” but to my surprise, I recently found out that “palak raita” as such is new to some of them. Hence I thought of sharing this side-dish with you all. This is not only easy to prepare but also tastes good with any rice dishes such as pulao, biryani, fried rice or even puliogare to name a few. It's also a good accompaniment to any rotis, phulkas or parathas.

If interested, you can check my other palak (spinach) dishes -  Palak Patradau and Dill and Spinach Curry.

IMG_2698-001


Ingredients:

Palak (Spinach) A small bunch
Curd (thick) 1 cup
Salt As per taste
For Tempering:

Oil 1-2 tsps
Mustard seeds 1 tsp
Cummin seeds 1 tsp
Fenugreek (methi) seeds 1 tsp
Dry red chilly 1-2

Method:

  1. Pick and wash the fresh palak (spinach). Roughly chop them into chunks. If using steamer, steam them for about 12 mins or if cooking in water, ( use very little water as it leaves its own water) cook till they are wilted.
  2. In the meantime, beat or whisk the curds well and keep it aside.
  3. When the steamed (or boiled) spinach has cooled down, pour the beaten curds over it.
  4. Then add salt and prepare the tempering - Heat oil in the tempering pan and add all the ingredients mentioned under it. When it stops spluttering, switch off the flame and pour the contents on to the spinach and curd mix.
  5. Mix well and it is ready to be served.

Main ingredients
Spinach chopped 
Chopped spinach in steamer
Just removed from the steamer
Curd beaten and kept aside
                           
Beaten curd poured over the steamed spinach

Tempering under process

Tempering added to the above mix
Palak Raita ready to be served
                                 

Preparation Time: 10 mins
Cooking time : 15 mins
Seves : 2-3 persons

Note:
  • I used one red chilly for tempering. You can use more as per your taste.
  • Curd used should not be sour.
  • Ideal side-dish during the summers.
  • It tastes good when served chilled.