Showing posts with label side-dish. Show all posts

Friday, February 27, 2015

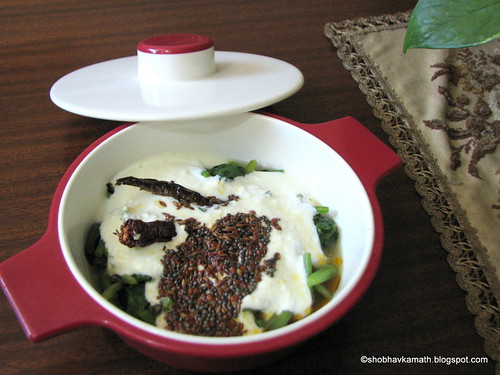
Palak Raita


Most of us Indians are familiar with the word “raita” but to my surprise, I recently found out that “palak raita” as such is new to some of them. Hence I thought of sharing this side-dish with you all. This is not only easy to prepare but also tastes good with any rice dishes such as pulao, biryani, fried rice or even puliogare to name a few. It's also a good accompaniment to any rotis, phulkas or parathas.

If interested, you can check my other palak (spinach) dishes -  Palak Patradau and Dill and Spinach Curry.

IMG_2698-001


Ingredients:

Palak (Spinach) A small bunch
Curd (thick) 1 cup
Salt As per taste
For Tempering:

Oil 1-2 tsps
Mustard seeds 1 tsp
Cummin seeds 1 tsp
Fenugreek (methi) seeds 1 tsp
Dry red chilly 1-2

Method:

  1. Pick and wash the fresh palak (spinach). Roughly chop them into chunks. If using steamer, steam them for about 12 mins or if cooking in water, ( use very little water as it leaves its own water) cook till they are wilted.
  2. In the meantime, beat or whisk the curds well and keep it aside.
  3. When the steamed (or boiled) spinach has cooled down, pour the beaten curds over it.
  4. Then add salt and prepare the tempering - Heat oil in the tempering pan and add all the ingredients mentioned under it. When it stops spluttering, switch off the flame and pour the contents on to the spinach and curd mix.
  5. Mix well and it is ready to be served.

Main ingredients
Spinach chopped 
Chopped spinach in steamer
Just removed from the steamer
Curd beaten and kept aside
                           
Beaten curd poured over the steamed spinach

Tempering under process

Tempering added to the above mix
Palak Raita ready to be served
                                 

Preparation Time: 10 mins
Cooking time : 15 mins
Seves : 2-3 persons

Note:
  • I used one red chilly for tempering. You can use more as per your taste.
  • Curd used should not be sour.
  • Ideal side-dish during the summers.
  • It tastes good when served chilled.

Saturday, June 28, 2014

"Magge" Pachadi


Friends, I have been quite preoccupied with some social commitments, relatives visits and water problem with the result, my blogging took a back seat. I had almost become a recluse where facebook was concerned and had no time to surf the net. 

Anyway, here I am. So, what is “Magge”?
“Magge” is the konkani word for “Yellow Cucumber”. I believe, it is also called as “coloured cucumber”. Down south, especially in Mangalore, Udupi and the coastal regions, this vegetable is available in plenty and stored in the houses for use during the monsoons. It stays fresh even without refrigeration for a longer period than other vegetables. 

We Amchis (konkani speaking people) add “magge” in a lot of dishes without peeling the skin. Since pachadi is made without cooking, it needs to be peeled as the skin is slightly tough. 


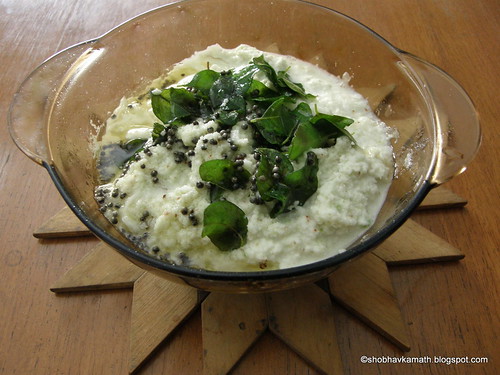
Magge Pachadi


Ingredients:

Magge (yellow cucumber) 1/4th piece
For Grinding:

Freshly grated coconut 1/2 cup
Green chilly 1 or 2
Salt As per taste
For tempering:

Oil 1-2 tsp
Mustard seeds 1 tsp
Curry leaves 1 sprig


Method:

  1. Wash the Magge (yellow cucumber) and cut 1/4th piece of it.
  2. Peel, discard the seeds and grate it (either manually or in a food processor ) and place it in a bowl.
  3. Grind all the grinding ingredients into a paste adding little water (if needed). Add this ground paste to the grated cucumber and mix well.
  4. Heat oil in the tempering pan. Add mustard seeds and when they splutter, add the curry leaves into it. Remove from flame and pour the entire contents on to the mixture of grated cucumber and coconut paste. Mix well.
  5. Serve this pachadi as a side dish.

"Magge" cut into half
Some of the ingredients
Grated "magge"
Grated coconut & green chilly ground to a paste
Ground paste added to grated "magge"
Tempering under process
Magge Pachadi ready to be served

Preparation time : 15 mins
Cooking time : 3-5 mins
Serves : 2

Note:
  • This pachadi is also a good accompaniment for chapattis/rotis.
  • This is generally prepared during the summer months as it is very cooling.
  • This is a cold dish and is very tasty. 


Thursday, August 1, 2013

Spicy Green Gram Idli (Sanna Khotto)


This spicy idli is not a breakfast dish. It is served as a side-dish with a teaspoon of coconut oil dribbled on top of the pieces. ( If you are averse to coconut oil, you can omit it. It still tastes great.)  We “Amchis” (Konkani speaking people) call it “Sanna Khotto” and we love our coconut oil on specific dishes (to name a few - Pathrado, Humman etc) and this is one of them. Traditionally, it is prepared with rice only or with rice and green gram and is steamed in cups stitched with leaves from jack-fruit tree and the cup prepared in this way, is known as “Khotto”.  This can also be steamed like normal idlis in greased idli cups.
I have omitted rice totally in this recipe and steamed it in a greased steel plate. It tasted wonderful.

Spicy Green gram idli 22

Ingredients:

Green gram (Moong)
¾ cup
Coconut gratings
½ cup
Roasted red chilies
4-5
Tamarind pallet
Marble size
Asafetida (hing)
¼ tsp
Salt
As per taste
Oil
For smearing the plate


Method:

  1. Wash and soak the green gram for about 2-3 hours and then drain the water.
  2. Grind the soaked green gram along with coconut gratings, roasted red chilies, tamarind, asafetida and salt with very little water to a coarse (like semolina) paste.
  3. Grease a steel plate with oil and spread the ground mixture evenly in it and steam it in a pressure cooker (without the whistle) or in a steamer for about 35 - 40 mins or until done.
  4. When slightly cooled, cut it into squares.
  5. Serve hot.

Ingredients
Ingredients ground to a coarse paste

 
              Ground paste spread evenly on a greased steel plate

Steaming under process
Just removed from the steamer

Cut into square shapes when slightly cooled

Placed in a serving bowl

Makes: 16 pieces

Note:

  • Chopped onions can be added if desired to the ground mixture instead of asafetida.
  • Another variation is:  chopped spinach when added to the ground mixture also enhances its taste.

Saturday, June 8, 2013

Snake Cucumber Salad (Khamang Kakdi)


Snake Cucumbers
 
I am not sure how many of you are aware of this snake-like variety of cucumber. People in the north of India are familiar with it and they call it “Kakdi “ or “Kakri”. I later on found out from the net that it is also known as “Armenian Cucumber”.  Frankly speaking, I was totally clueless about this vegetable. Lately, I used to see a vendor selling these (snake-like, light green coloured vegetables) in a cart, from our balcony and used to wonder what they were. Then, one fine day, I saw it on a TV channel and the host was explaining the nutritive value of this wonderful vegetable.

Apparently, unlike other cucumbers this particular variety can be eaten even by those who are prone to cold and cough. (My spouse avoids cucumbers as he immediately catches cold after eating them.) When I heard this on TV, at the first opportunity, I bought a small quantity (4-5) for a trial basis and believe me it was crisp, tender and delicious. It can be eaten raw without removing the skin. And, my spouse had no problem even after eating it. We were both delighted!

This is a typical Maharashtrian dish known as “Khamang Kakdi”. The only change I made in this dish is the use of Snake cucumber instead of the normal one that is available.

 Khamang Kakdi 20

 
Ingredients:

Snake Cucumber
4-5
Grated coconut
½ cup
Roasted peanuts
½ cup
Green chilies
2-3 or more
Lemon juice
2 tsps
Chopped coriander leaves
2 tbsps
Sugar
½ tsp
Salt
As per taste
Seasoning ingredients

Oil
1 tsp
Mustard seeds
1 tsp
Curry leaves
1 sprig

Method:

  1. Roughly crush the roasted peanuts and keep aside.
  2. Chop green chilies and lightly crush them and keep aside.
  3. Wash the snake cucumbers, cut them into cubes and place them in a bowl.
  4. Now add the crushed roasted peanuts, green chilies, grated coconut, chopped coriander leaves, lime juice, salt and sugar into the bowl.
For seasoning: Heat a small seasoning pan, add oil in it and when the oil is heated, add mustard seeds and when it starts spluttering, add the curry leaves. Remove from flame and add the contents into the above prepared mixture.
Mix well and serve immediately.


Snake (cucumbers) in the basket
Ingredients
Snake cucumber being cut into cubes
All the ingredients being combined in a bowl
Getting ready to serve
 
Preparation time:15-20 mins
Seasoning time : 5 mins
Serves: 4


Note:
  • This is generally served as a side dish.
  • In case you want to serve this at a later stage, then add salt just before serving.
  • Any type of cucumber can be used in making this salad. English cucumbers that are currently available in most of the supermarkets are another option.


Sunday, April 15, 2012

Ripe Banana Gojju (sweet, sour and spicy)


Summer is here! As you all know that during this period, fruits and vegetables if not preserved properly will ripen fast and rot easily. It’s a shame to waste food under any circumstances.

Among the fruits, bananas ripen very fast. And since they are generally not preserved in the refrigerator, the best thing to do is to consume them fast or else they will over-ripe and when that happens, the peels of the banana turn black and the sight of which prevents you from eating it. But now there is a solution! You can prepare this tasty "gojju" from the over-ripened ones too!

This “gojju” is a very common dish among our GSB (Konkani speaking) community. However, there are different variations to it.  I learnt this version from my Mom.

This is served as a side dish. It also tastes good when eaten with phulkas or chapattis. The sweet, sour and spicy combo makes it very appealing. I remember one of my nephews (during his childhood days) who was so fond of this dish that he would allow the bananas to ripen so that “gojju” can be prepared and then he would relish it as a dessert !!


Ripe Banana Gojju 21 
 Gojju with phulkas

Ingredients:

Banana (ripened)
1 large
Green chilies (chopped)
1or 2
Water
½ cup
Salt
As per taste
Lime juice
About 11/2 tsps
Seasoning Ingredients:

Ghee (clarified butter)
1 tsp
Mustard seeds
½ tsp
Curry leaves
1 sprig


Method:

  1. In a bowl, place chopped green chilies and salt and roughly crush them.
  2. Peel the banana. Cut them directly into the bowl containing the mixture of green chillies and salt.
  3. Then with the help of potato masher, mash the banana well into the mixture.
  4. Immediately add the lime juice. Next add salt and water and mix well and keep aside.
  5. Now prepare the seasoning: In a small pan, heat the ghee on a low flame and add to it the mustard seeds. When the mustard seeds start spluttering, add the curry leaves. Switch off the gas and immediately pour the entire contents onto the prepared banana mixture.
  6. Mix well and serve.
      

    Preparation time                          : 10 mins
    Cooking (for seasoning) time      : 3 mins
    Serves                                          : 2


    Note:
    • The addition of lime juice prevents the banana mash from discoloration and at the same time gives it a nice lemony flavour.
    • For seasoning, you can use oil but Ghee is recommended as it gives a nice aroma to the dish.
    • You can also use a blender to mash the bananas. Add lime juice while blending it.
    • For those with a sweet tooth, can add sugar for that extra sweetness as per their taste. I would recommend jaggery (palm sugar) instead.

    Tuesday, March 6, 2012

    Happalla Kismuri


    In Konkani language, “Haappolu” means Chilly Pappad and “kismuri” meaning a dry mixture. It is served as a side-dish and instantly adds that "zing" to any bland lunch!

    This “kismuri is generally prepared during rainy season in our villages as in those days venturing out to buy vegetables was next to impossible. Hence, before the onset of monsoon, a lot of items (non-perishables) would be stocked in every household and one such item would be “happollu”.

    These “Chilly Pappads” can be deep fried or fried directly over the flame. It is also eaten plain as an accompaniment during lunch or dinner like a normal pappad - except that, these are red in colour and very spicy.

     Another "kismuri" which tastes divine is the  "Bitter-gourd Kismuri" .

     Happalla Kismuri 25
     Happala Kismuri


    Ingredients:

    Happalla (Chilly Pappad)
    8
    Onion (chopped finely)
    1 medium
    Freshly Grated coconut
    2 tbsps
    Coriander leaves (chopped)
    1 tbsp
    Optional ingredients:

    Oil
    For smearing the pappad
    Green chilies (chopped)
    1
    Lime juice
    1 -2 tsps
    Salt
    As per taste


    Method:

    1. Fry the chilly pappad directly over low flame. Fry it on either side using tongs till dark brown spots appear. Fry all the pappads in similar manner and keep them aside.
    2. Smear each pappad with oil. (Generally coconut oil is used. You can use any oil of your choice.  I have omitted the oil in my recipe).
    3. In a separate bowl, crush together the chopped green chillies and salt
    4. In the same bowl, add grated coconut, chopped onions, chopped coriander leaves, and lime juice. Mix well and keep aside.
    5. Crush all the chilly pappads and combine it with the above mixture.
    6. Serve immediately.
     Haapplla Kismuri 2
    " Haappolu" (Red Chilly Pappad) being fried over flame

    Happalla Kismuri 9
     "Haappolu" being fried with the help of tongs

     Happalla Kismuri 18
     Ingredients ready for preparing the "kismuri"


    Preparation time: 10 mins
    Cooking time     : 10 mins
    Serves                :  4


    Note:

    • This is a great accompaniment for rice and dal or rice and curds. 
    • Combine the crushed Haappolu to the onion-coconut mixture just before serving or else it gets soggy and looses its crunchiness.
    • It tastes heavenly with our simple “Paez” (Konkani word for “kanji”).
    • Since the “happallas are very spicy and also contain salt, you may omit the green chilies and salt depending upon ones taste.
    • These Chilly Pappads are available in any Mangalore Stores.

    Monday, February 13, 2012

    “Sambharbalipaanaache” (Oregano leaves) dry chutney

    Just returned last week from our annual trip to Katapadi, our village in Udupi district for the “Ratha-Utsav” (Teru), festival. I had a wonderful time and have come back rejuvenated with some new, easy and healthy recipes!

    This dry chutney which I learnt recently is very easy to prepare, tasty too and does not require grinding.This resembles the famous Maharashtrian dish called "Jhunkaa".

    You can also try out my other dishes from this "Sambharbalipaan", a wonderful medicinal herb  - “Tomato and Oregano Omlette” and yet another “Sambharbali paanaa” (wet) chutney".
    I could manage only a few pictures this time as my camera indicated that batteries are empty.


    Oregano dish 24

     
    Ingredients:

    Oregano leaves (chopped)
    About 15
    Onion (chopped)
    1 medium
    Channa dal (split gram)
    1 tsp
    Udad dal (split black gram)
    1 tsp
    Methi (fenugreek) seeds
    ½ tsp
    Jeera (cumin)
    ½ tsp
    Haldi (turmeric powder)
    ½ tsp
    Tamarind pulp
    1 tsp
    Jaggery (powdered)
    1 tsp
    Sambhar powder
    2 tsps
    Besan (gram flour)
    2 tsps
    Coconut gratings (optional)
    1-2 tbsps
    Oil
    3 tsps
    Salt
    As per taste


    Method:

    1. Wash the oregano leaves and then chop them finely and keep aside.
    2. Mix the gram flour with a little water (see that no lumps are formed) in a bowl and keep it aside.
    3. Heat the oil in a pan (preferably non-stick).
    4. To it add the channa dal, Udad dal, Methi, Jeera, and fry it for a while till the dals turn slightly brown. Next add chopped onions and turmeric powder. Saute it till the onions turn translucent.
    5. Now add the chopped oregano leaves and continue stir frying it for only 2-3 minutes  while keeping the flame on medium.
    6. Next add the tamarind pulp, powdered jaggery, grated coconut, sambhar powder and salt. Give it a good stir.
    7. Finally add the gram flour mixed with water and mix well for a minute or two and switch off the burner.

    Oregano dish 10
     "sambharbali paan" (oregano leaves) chopped

    Oregano dish 12
     Dry ingredients being stir-fried


    Preparation time : 10 minutes
    Cooking time      : 15 mins.
    Serves                  :  2


    Note:

    • This dry chutney can be used as a side-dish too.
    • It also goes well with chapattis or as a filling in sandwiches.

    Tuesday, August 2, 2011

    Raw Amla (Gooseberry) Chutney


    Indian Amla or gooseberry is a pale green fruit. It is round in shape and smooth in texture. This fruit is astringent in taste; when you take a bite of this fruit and as soon as your saliva comes in contact with it, it leaves a sweet taste in your mouth.
    However, there is another variety (star gooseberry and in konkani it is known as "Raaj Aavalo") which is smaller in size but very sour to taste. And as kids, we used to eat them with salt and chilly powder and actually relish them! Apparently this variety has no medicinal value.

    This recipe was recently given to me by my aunt. It was so simple, that I tried it immediately. It was an instant hit at home. So I thought of sharing this with you all.
    As you all know that amlas are a good source of vitamin C and has various health benefits too.

    Like all “amchis” (term used for Konkani speaking people) I generally put them in brine (salted water) and use them whenever possible for preparing “Saaru” or “Gojju”. I have observed that amla is now available throughout the year at least in Karnataka.


    Amla Chutney
    Amla Chutney


    Amlas
    Raw Amlas (Gooseberries)


    Ingredients:

    Amlas (Gooseberries)
    3 medium
    Lime juice
    1 tsp
    Grind together:

    Coconut (grated)
    1 tbsp
    Green chilly
    1
    Coriander leaves
    A small bunch
    Salt
    As per taste
    Seasoning ingredients:

    Oil
    1 tsp
    Mustard seeds
    ½ tsp
    Curry leaves
    1 sprig


    Method:

    1. Wash the Amlas and pat dry them with a kitchen towel. Grate the amlas in a bowl. Add lime juice to it. Mix well and keep aside. (Discard the seeds of the amlas).
    2. Grind together all the four ingredients mentioned above (coconut, chilly, coriander leaves and salt) into a smooth paste.
    3. Add this ground paste to the grated amlas and mix well.
    4. Heat a small pan. In it add oil, and mustard seeds and when the mustard seeds starts to splutter, add the curry leaves. Remove from flame and pour the contents on to the amla mixture.
    5. Mix well and serve.

    Note:

    This chutney goes well with rice and sambhar or rice and dal or with chapattis too.
    It also tastes good in sandwiches.

    Link to pictures of Star gooseberry:

    Friday, May 6, 2011

    Quick Raw Mango Recipes


    Summer is the season for mangoes. Ripe mangoes are a treat in themselves but raw mangoes has a taste of its own. Just the thought of raw mangoes, makes ones mouth water!
    The varieties of recipes that can be prepared with the raw mangoes are endless – pickles, panna, pachadi, chutney etc.

    I had one fairly large Totapuri Raw Mango. So I decided to make two dishes (pachadi and chutney) for the price of one! In most south-Indian households there is always a stock of coconut gratings. So these recipes can be done in a jiffy.

     I grated the whole raw mango and kept aside about two heaped tablespoons for making chutney and used the rest for making pachadi.


    Raw Mango Pachadi

    Pachadi


    Ingredients:

    Raw Mango
    1 medium size
    Coconut gratings
    ½ cup
    Green chillies
    3
    Asafetida
    A pinch
    Salt
    As per taste
    Seasoning ingredients

    Oil
    2 tsps
    Mustard seeds
    ½ tsp
    Curry leaves
    1 sprig

    Method:

    1. Wash the raw mango and pat dry it with a clean kitchen towel.
    2. Grate the mango either manually or in a food processor.
    3. Grind coarsely the coconut gratings along with green chilies, salt and asafetida with a little water. Place the ground mixture in a bowl.
    4. To this ground mixture, add the grated mango and mix well.
    5. Lastly heat oil in a small pan and add the seasoning ingredients in it. When the mustard seeds stops spluttering, switch off the gas and pour the contents in the mixture of coconut and raw mango gratings. Mix well and serve.

    Note
    • Pachadi is generally used as a side dish. It also goes well with chapattis.
    • This is a typical Konkani (GSB community) recipe

    Raw Mango Chutney
     

    Raw Mango Chutney


    For this you will need – 2 heaped tbsps of grated raw mango, 3tbsps of coconut gratings, a small bunch of washed and cleaned coriander leaves, 5-6 garlic cloves, 2-3 green chilies and Salt.
    Grind all these ingredients to a smooth paste. If necessary, you may add a little water while grinding.

    Note:
    • This chutney tastes excellent with chapattis, as sandwich spread or even with pakodas and  bajjias. It can also be used as a dip.
    • Any type of raw mango can be used for making chutney or pachadi.

    Thursday, July 8, 2010

    Daangar (Drumstick leaves Balls)


    “Daangar” is traditionally made with “Taikillo” (in konkani language) which is a wild leafy vegetable and grows only during the monsoons.


    I have substituted drumstick leaves for “Taikillo” as these are available throughout the year and also have medicinal/nutritional benefits. Drumstick leaves are slightly bitter in taste but the snack as such is very tasty especially so when it rains!!


    This snack or side dish tastes good with or without chutney.


    Daangar


    Ingredients:


    Leaves of drumstick

    3 cups

    Toor Dal or Channa Dal

    ¼ cup

    Rice

    ¼ cup

    Tamarind

    A small lump (a big rajma size)

    Coconut gratings

    1- 2 tbsp

    Dry Red chillies

    5-6

    Salt

    As per taste

    Oil

    For frying


    Method:


    1. Wash and soak rice and toor dal together in water for about an hour. Then drain the water.
    2. Wash only the drumstick leaves (stems to be discarded) and roughly chop them. OR if you have a food processor, put the leaves in it and run it in for a few seconds.
    3. Grind the washed and soaked toor dal & rice mixture without adding water along with red chillies, coconut scrapings and tamarind to a coarse paste.
    4. In a bowl, add the ground mixture, chopped leaves and salt. Mix it well with your hands. Shape small balls of this mixture and slightly flatten them.
    5. Deep fry these flattened balls in oil.
    6. Serve hot.


    Makes about 18 (Daangars) balls


    Note:

    Drumstick leaves Pancake
    • For weight watchers - instead of deep frying it, you can fry it in a tawa or frying pan like a dosa /pancake. Smear a little oil on the pan Take a little mixture and place it on the frying pan and flatten it with your hands. Wet your hands first with water and then flatten to the desired shape. Add a few drops of oil on the sides of the pancake and fry it on both sides.
    • Adding chopped raw onions to the mixture also enhances the taste of Daangar as well as Pancake


    See here for picture of drumstick leaves :

    http://img101.imageshack.us/img101/8007/drumstickleaveskn2.jpg


    See here for nutritional benefits of drumstick leaves:

    http://www.brighthub.com/health/diet-nutrition/articles/52344.aspx